 |
 |
In my upholstering experience I have tackled a number of arm-chairs, several stools, a couple of headboards, and now most recently, a sofa.
I haven't taken on a sofa in the past partly because the need just didn't arise, but also because the size of the project was a little daunting. Now that I've done it, I can say that it really isn't any more complicated than an arm-chair, but it is more work and more time, simply because it's bigger.
Re-upholstering a sofa yourself has 2 great advantages: first, you can save yourself a ton of money, and second, you can customize your sofa exactly how you want it. It's also an environmentally friendly practice preventing many otherwise good pieces of furniture from ending up in a landfill - but the advantages really end there. It is a ton of tedious, exhausting work.
Re-upholstering a sofa is really only going to be worth it if you really love the lines, shape and form of the sofa. Giving an old sofa new skin is going to make it look like new - but it's not going to change the shape or form of it, so if you're not totally in love with the shape of your sofa, don't bother. If you love the shape, but hate the skin - go for it!
In my case, I was looking for a fairly simple, stream-lined sofa for my new living room. Square, but not chunky, mostly modern, but with just a dash of classic charm because that`s how I roll. Something in-between this Aiden sofa from Crate & Barrell that runs for around $2849.27:


One of the great advantages to living in this day in age is that everything in fashion and style has pretty much already been done (Gasp! Yes I said that). What we mostly see now is a regeneration of old ideas sometimes with a slightly new twist. This is great for re-using old furniture, because whatever style you are looking for you can look to pieces from the past and find just what you're looking for in the present. I was headed back to the 1960s. The decade of tumult and change, free-love, flower-power, and stream-lined, minimalist architecture and interior design.

And so the hunt began. I scoured local thrift-shops looking for a 1960`s sofa. I didn`t care what it looked like on the outside, I was going to change that. What I was looking for was that beautifully simple, minimalist form.
I finally found one and snatched it up right away for a whopping $35:

It was well worn, but solid and heavy - usually an indication that you've got a good quality piece of furniture on your hands. My husband thought I was crazy when I brought it home, but I told him he just needed to relax and trust - I had a vision (that filled him with re-assurance). This is how I made it happen:
TOOLS & MATERIALS:
- Flat butter knife
- Flat-head screw driver
- Pliers
- Hammer
- Staple gun
- Staples
- Approx 6-8 yards of upholstery fabric (more for a sofa bigger than mine)
- Sewing machine with heavy duty needle
- Upholstery piping (if it is currently present on the sofa)
- Upholstery thread
- Screwdriver
- Permanent marker
Optional:
(if needed)
- Cotton batting
- Fabric covered button kit & buttons
- Waxed button cord
- Large upholstery needle (for buttons)
- Cushion zippers (if old ones can not be re-used)
METHOD:
(bare with me, this is a bit of a long process . . .)
1) Remove the bottom covering:
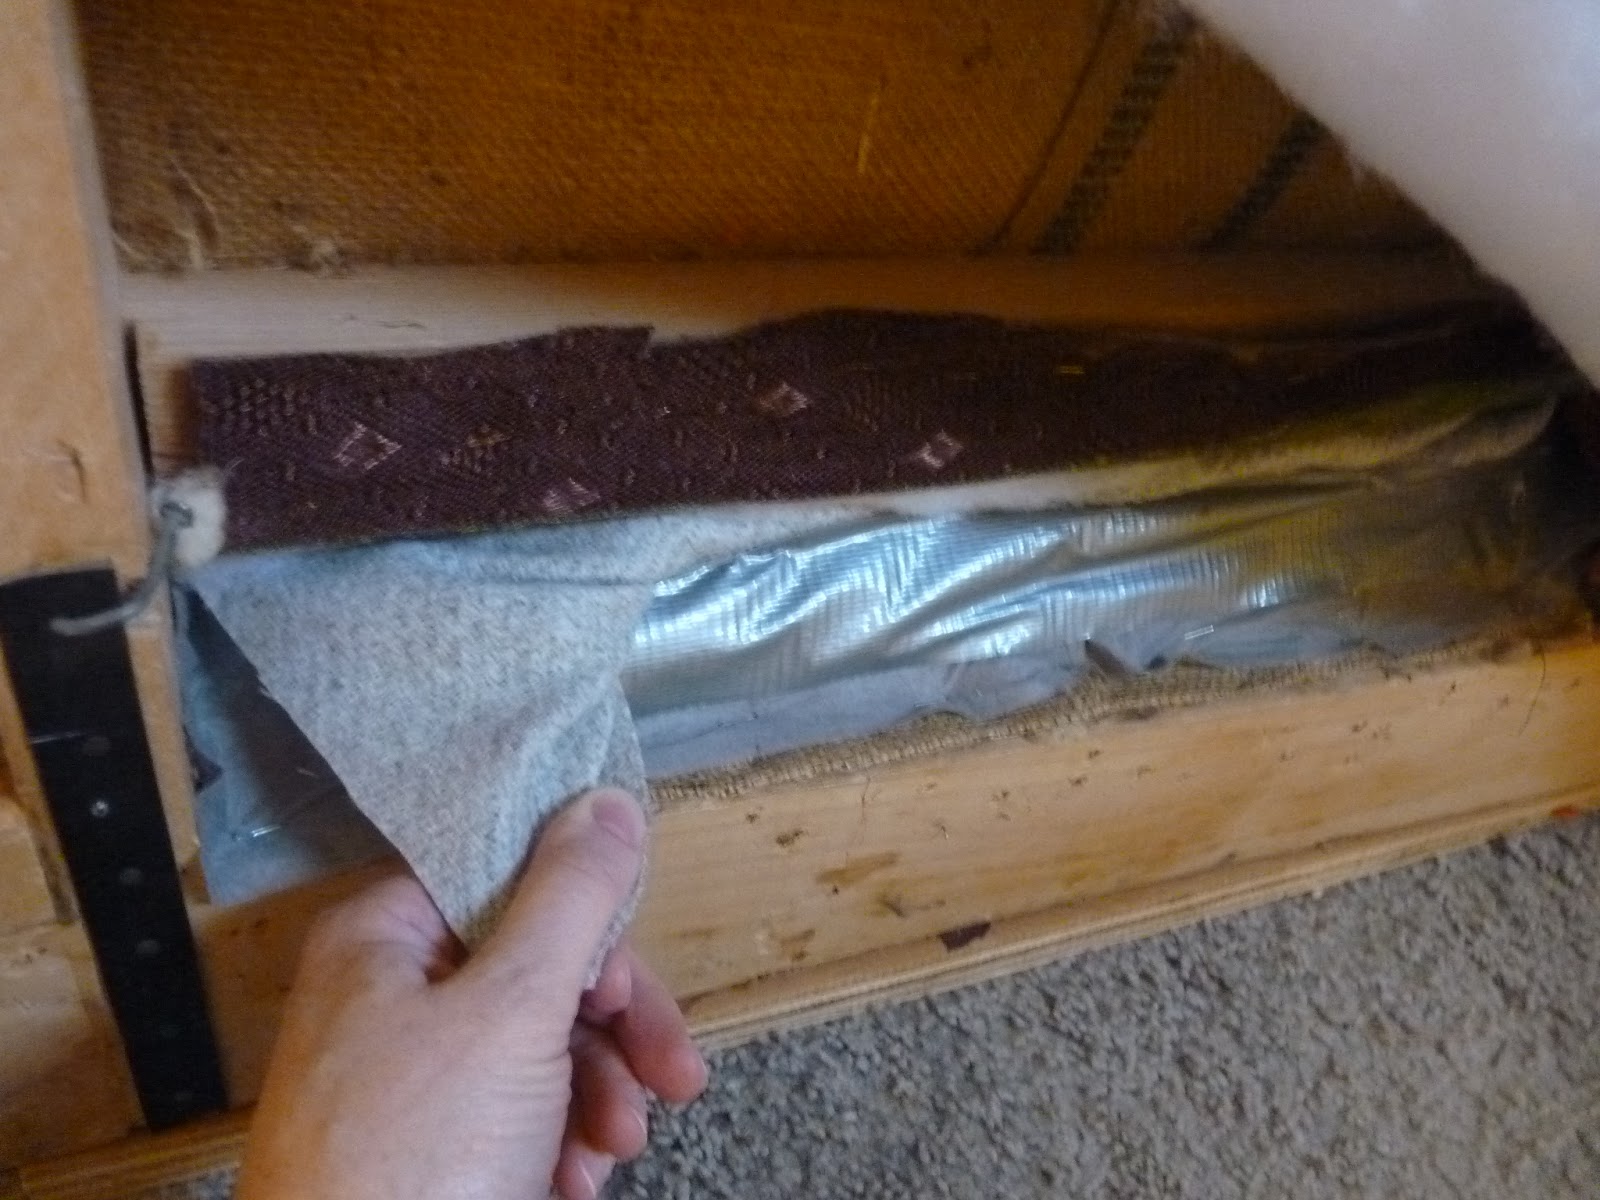
Flip the sofa upside-down so you can access the bottom and take off the legs and accompanying hardware. If you are re-using the legs, put them and the hardware aside. Using in combination your butter knife, flat-head screwdriver and pliers, pull out all of the staples attaching the bottom covering to the bottom of the sofa. Remove the bottom covering and place it aside.

Now is a good time to take a peak at the internal guts of your sofa and make sure everything is in good working order. In an older piece of furniture like mine, it is typical to find a mesh-work of burlap straps like this. These can fray and disintegrate over time, and may need to be patched, replaced or re-secured. It's also good to check for loose, bent, or rusted springs that may need attention. You'll also want to check on the condition of the wood frame and see how it's holding up. In my case, some of the original burlap straps had disintegrated, but I wasn't the first person to re-upholster this piece, and the last guy did a good job of repairing the damage which was still holding strong, so it didn't need much attention from me.

2) Release the fabric from around the bottom of the sofa:
Pick out all the staples from the bottom of the sofa frame, releasing the existing upholstery fabric from around the bottom of the sofa:

In the case of my particular sofa, I also had this pleated flange around the bottom of the sofa which had to be removed. This was purely a decorative piece that I didn't plan to add to my final product, so I just discarded it once I had it free from the rest of the sofa. If I did want a pleated flange on the final product, I would keep this piece and place it aside until all the rest of the sofa was finished.

 |
| Staples hidden on the under-side of the flange. |
3) Remove the back:
Flip the sofa over onto it's front, placing the back face-up. Most likely, the back fabric will be held in place by 2 metal stretchers on either side of the back of the sofa, and a stapled card-board strip along the top. Slip your butter knife under the seam on one of the sides and gently lift up to release the stretcher. You will want to save and re-use these stretchers, so be careful not to bend them too much as you remove them. Once you have them removed, label them with a permanent marker and place them aside. Here is a video showing the process:
http://www.youtube.com/watch?v=UXceGNAAVIo&feature=youtu.be
Repeat the process on the other side of the back of the sofa.
Peel back the back piece of fabric over the top of the sofa, revealing the cardboard strip stapled along the top:
 Pull out the staples, releasing the back piece of fabric. If you can, try to keep the cardboard strip intact and in good shape so you can re-use it later on. Label it and put it aside (if it does rip apart on you, you can make a new one out of thin, cereal-box cardboard). Label the back piece of fabric with your permanent marker and put it aside.
4) Open & remove outside of sofa arm:
Turn the sofa up-right, and release the fabric from the outside of the sofa arm. In my case it was just like the back, and was held in place by a metal stretcher on the front side, and a stapled cardboard strip along the top.

 |
| Release and remove the metal stretcher on the side the same way you did in the back. Then remove all of the staples from the cardboard strip along the top. Label the metal stretcher and cardboard strip and place aside. |

Label the removed piece of fabric and place aside. Repeat on the other side of the sofa.
5) Loosen front pieces:
At this point I decided it was necessary to loosen the front pieces before I could continue on with the sides. I began by snipping the button threads in order to release the buttons, and then placed the removed materials to the side for later re-use.
 |
| Buttons in front |
 |
| Buttons in back |
Next, I had to go into the back of the sofa and discover where the front pieces of fabric were secured, then release them by removing the staples holding the fabric in place:


 |
| You may want to keep a vaccumm handy to clean out the interior of your sofa - yuck! |
6) Remove bottom front piece:
Remove the bottom front section of fabric from the sofa and use a seam-ripper to split the seams and separate the different pieces:


6) Create new fabric pieces:
Iron the separated pieces flat, and place them right-side up on your new fabric, which should also be right-side up. Cut out the new pieces using the old pieces as a pattern (*Tip* sometimes the old pieces of fabric will have several snips in places used to help maneuver the fabric through the structure of the sofa. I will cut the most obvious ones to begin with, but hold off on the smaller, less significant ones until I am maneuvering the fabric into position on the sofa and then only cut them if I find it necessary)


Sew the new pieces together exactly the same way the old ones were. In my case, I began by sewing the front corner pockets on the bottom piece of fabric:
 |
| Find the corner. |
 |
| Pin the edges together right-side to right-side. |
 |
| Sew pinned edge. |
 |
| Turn the corner inside out. |
Next, pin and then sew the bottom piece of fabric to the seat fabric right-side to right-side:


Before I could place the new fabric piece on this part of the sofa, I first had to deal with a padding issue that needed to be addressed. Because the original sofa had a bottom pleated flange the padding on the front of the sofa didn't extend all the way to the bottom of the frame. I didn't want to keep the flange, so I used layers of cotton batting to add more padding to the bottom of the frame until it was equal to the top:


7) Position new fabric piece onto sofa:
With the padding issue addressed, I could move on and loosely position the new front piece onto the bottom of the sofa:

First, I fit the corner pockets until they were snug:

Then I began to tuck in the edges:

 |
Tuck the fabric in to the side of the sofa. |
Then I came around to the other side of the sofa arm, found the tucked edge of the fabric, pulled it though and secured it to the sofa frame with staples:
 |
| Find the fabric on the other side and pull it through. |
 |
| Secure the fabric to the frame of the sofa with staples. |
 |
| Tuck the fabric into the back. |
 |
| Find the fabric on the back side, and pull it through. |
 |
| Secure the fabric to the sofa frame with staples. |
 |
| Staring on the side, I pulled the fabric tight and secured the edge with staples. |
 |
| Once the sides were done, I got started on the bottom, pulling it tight and stapling it in place all along the bottom edge. |

8) Remove the remaining arm pieces:
With the new bottom piece secured in place, I flipped the sofa right-side up again, and began to remove the remaining arm pieces on each side of the sofa. Label and place each piece of fabric to the side as you remove it:
 |
| On a older sofa like this that uses organic cotton padding, peel the fabric away carefully so as not to disturb the padding. |

Once I opened the arm fully, I felt like the arm of the sofa could use a little more padding, so I decided to wrap it in cotton batting before putting the new fabric on:
 |
| Place a large piece of cotton batting loosely over the arm of the sofa. |
 |
| Trim away the excess. |
 |
| Tuck the batting edges into the sofa. |
 |
| Trim and tuck until the cotton batting fits the arm. |
9) Sew new arm covering and secure on sofa:
With the extra padding placed on my sofa arm, I could get back to the business of creating a new fabric covering for it. Take the old piece and use a seam-ripper to separate any seams:

Lay the old piece of fabric out flat (it's a good idea to iron it first), right-side up on top of your new fabric (which should also be right-side up), and cut the new piece of fabric using the old piece as a pattern:


Sew the seams together on the new piece of the fabric the same way they existed on the old piece of fabric (in this case it was just the corner that needed to be sewn together).
 |
| Lay out the corner. |
 |
| Pin the edges together right-side to right-side and sew. |
 |
| Turn the corner inside out. |
 |
| First, fit it loosely on the arm. |
 |
| Tuck the edge into the sofa and fit the corner. |
 |
| Find the tucked fabric edge on the other side of the arm, pull it through, and secure it to the wood frame with staples. |


With the new fabric on the inside of the arm secured, I found it easier to tip the sofa back onto it's back to work on the front part of the sofa arm.
 |
| Fold, pull, and secure the under-side of the fabric to the front of the sofa frame, covering the stapled edge of the bottom piece. |
 |
| Fold the fabric over and pull it tight around the front of the arm. Secure the fabric to the frame with staples along the edge, being sure to pull it tight all the way along the front edge of the arm. |
 |
Flip the sofa back to being right-side up again, and use the same process you just used on the front edge of the arm to secure the top edge of the fabric to the top edge of the arm on the frame. Fold in the corner and secure with staples. |
With the inside piece of the arm now secured, we can finish off the arm by replacing the outside piece. Find the old outside piece which you labeled and put aside earlier. Lay it out flat on your new fabric (both right-side up) and cut the new piece using the old piece as a pattern:

Next, I like to press the edges in by and inch or so to give me a nice straight line to work with:

Hold your new piece of fabric on the sofa arm and figure out just where it needs to be when finished:
 |
| Ironed edges to the top and front. |
 |
| Hold top edge of fabric in place. |
 |
| Flip fabric over the top of the arm, and tack the underside of the fabric in place with a few staples along the top edge. |
Fold the fabric back over to check the position and make sure you have the piece where you want it (needs to cover all the staples from the piece on the top of the arm). If it's not quite right, pull out the tack staples and try again until you get it just right.
 |
| Should look something like this: |

Now that the top edge is finished, you can move on to the front edge. Find the metal stretcher you removed from this section of the sofa earlier, and re-insert it into the front edge of the fabric, placing the edge of the stretcher along the ironed crease in the fabric.

Poke the spikes of the stretcher through the back side of the fabric so that they come through to the right-side of the fabric:

Turn the edge over so that the spikes of the stretcher are now facing inward toward the sofa:
 |
| You may want to trim the top corner slightly and fold it in underneath the stretcher. |

Pull the other side of the fabric around to the back of the sofa and secure it in place with staples:


Flip the sofa onto it's back exposing the bottom, and pull the bottom edge of the fabric tightly around the bottom edge of the sofa and secure in place with staples:


10) Remove the front of the sofa:
Now that the bottom, and both arms of the sofa have been replaced and secured, you can get to work on the front. Peel away the fabric off of the front of the sofa being careful not to disturb the padding underneath too much, and set it to the side:


 |
| Loosely fit the cotton batting around the front and back of the sofa. Trim away the excess. |
 |
| Tuck in the edges of the batting wherever you can, as deeply as possible. |
 |
| Trim and fold the batting to fit. |
 |
| Tack the batting in place using only a few staples. Leave the bottom open. |
11) Sew new front piece and secure on sofa:
Use a seam-ripper to separate any seams and detach the pieces that make up the front piece of the sofa (including any piping used). Iron out the pieces, and lay them right-side up on top of the fabric which should also be right-side up. Use the old pieces as a pattern to cut the new pieces:


Pin the new pieces together right-side to right-side, and sew them together the same way as the old piece.
*A note here about piping:*
In my other tutorial on upholstery I showed a different way to sew piping that is effective with plastic piping, but not so much with more flexible piping materials such as this cotton piping I ended up using on this project. For this type of piping I like to cut a strip of fabric the length I will need (I usually like to make it just a tad longer that what I need, because I'd rather be long than short) that is about 2" wide. Fold the material in half, over the piping, holding it in place with pins like so:

Then sew down the length right next to the piping using a zipper-foot:

Once the piping is sewn, I like to pin it around the edge of the piece of material that it is to border starting in the middle and working towards the ends. Once it's pinned, I will sew it in place using a zipper-foot before adding the joining piece of fabric:

 |
| *Tip* Making a few small snips in the edge of the piping beneath the seam will help you to get around corners with greater ease. |
 |
| Pin the joining piece of fabric to the main piece of fabric with the piping already attached right-side to right-side, and then sew it all together using a zipper-foot. |

Tuck the side and bottom edges of the fabric deeply into the cracks of the sofa until it all fits nicely. Find the tucked edges of the fabric from the back of the sofa, pull them through, and secure them to the sofa frame with staples:

Move to the back of the sofa. Pull the top edge of the fabric over the top edge of the sofa and secure to the sofa frame with staples. Fold in the corners and secure to the frame with staples. Pull the side edges around to the back of the sofa and secure to the frame with staples:

12) Replace buttons on front of sofa:
This is optional as not all sofa's will have buttons on the front, or you may not want them.
First of all you'll need to buy a fabric-covered button kit in the size you wish to use and enough fabric covered buttons for what you will need (available at any fabric store). Follow the instructions on the back of the kit to cover your buttons in the same fabric as your sofa:

Once your buttons are finished, thread a very large and strong upholstery needle with a fairly long length of waxed button cord (ideally - but I used high tension fishing line which worked just as well). Poke your needle through the back of the sofa where the buttons were previously placed, keeping your needle as straight as possible (this might take a little muscle):


Make sure the needle comes through the front in the right spot (if not try again). Pull the needle all the way through the sofa and thread it through the back of your fabric-covered button:

Push the needle back through the front of the sofa to the back:

Pull the needle all the way through the sofa. Pull both sides of the cord tightly and tie the cord around a secure object as tightly as possible (I just re-used these rolled up pieces of fabric that had been used before on the sofa). Pull the remaining end of the cord as tightly as possible and secure it to the sofa frame with a couple staples:

Repeat the process for all of the buttons that you will need.
13) Create a new back piece and position on sofa:
The back is going to go on exactly the same way as the outer side pieces, it's just a little bigger (use the pictures from the side for a visual reference). Find the back piece which you labeled and set aside earlier. Iron it flat and lay it out on top of your new fabric with both fabrics facing right-side up. Using the old piece as a pattern, cut the new piece. Iron in the top and side edges of the cut piece of fabric by about an inch or so, creating a crease. Check the piece to see if it fits the back of the sofa the way you want it (if not make the necessary adjustments). Holding the top edge in place, flip the rest of the fabric over the top edge of the couch and tack the underside of the top edge of the fabric to the sofa frame with a couple of staples along the edge. Fold the fabric back down to make sure it is positioned correctly. If it is, flip the fabric back over the top edge of the sofa and place the cardboard strip you previously removed from this section of the sofa back along the top edge of the fabric on the underside and secure it in place with staples using the ironed crease as a guide:

Flip the fabric back down and on one side of the back, re-insert the metal stretcher you previously removed from this section of the sofa on the underside of the fabric with the spikes sticking through to the right-side, placing the edge of the metal stretcher along the ironed crease:


Turn the edge over so that the stretcher spikes are facing inward toward the sofa (trim and fold in the top corner). Pull the fabric edge with the stretcher to the edge of the sofa where you want it, and pound the spikes into the sofa frame with a hammer:

Pull the bottom edge of the fabric over the bottom edge of the back of the sofa and secure to the frame with staples:

Flip the sofa upside down, and replace the bottom covering you removed when you first started. Secure the bottom covering to the bottom of the sofa frame with staples (if the bottom covering is not in good enough condition to re-use, create a new one). Replace leg hardware on each of the corners of the bottom of the sofa frame and screw in the legs. Flip sofa right-side up.
16) Cushions:
To create new cushion covers, remove one of the old cushion covers from the cushion and use a seam-ripper to separate all the seams and detach the pieces from one another. Iron the pieces out flat and lay them right-side up on top of your new fabric (which should also be right-side up). Use the old pieces as a pattern to cut the new pieces. Sew the new pieces together the same way as the old ones were, placing the new fabric pieces right-side to right-side. When finished, turn the cushion cover inside out, and replace the cushion. Check the fit, and make any necessary adjustments. Repeat the process to recover all your cushions (*Tip*: if all the cushions are the same, you don't need to rip apart every cushion cover. Just re-use the old pieces you've already ripped apart as a pattern to cut the appropriate number of pieces for all of the cushions).

In my case, I went to remove the cushion from the old cover, and was completely shocked at what I found. The foam cushion was so old that it had literally disintegrated into a crumbly mess. Clearly, I wouldn't be able to re-use these cushions, so I ordered 3 pieces of new furniture foam the same size as the cushions, wrapped the new foam pieces in cotton batting, and created 3 new custom cushion covers by tracing the foam pieces (top, bottom, & sides) onto my new fabric, leaving a 1/2" seam allowance. Then I sewed these pieces together with a zipper in the back and voila! I had new cushions and new covers!
16) Place the cushions back on the sofa and CELEBRATE FINALLY BEING FINISHED!!!!!

TOTAL COST:
- 2nd hand couch: $35
- 6 meters of upholstery fabric: $60
- Upholstery thread: $6
- Fabric covered buttons: $6
- 4 Sofa legs (2nd hand): $1
- 3 new foam cushions: $60
- 3 meters cotton batting: $60
- Staples: $6
+
$234.00
Every part of my body ached after finishing this project, and I felt like I couldn't use my hands for 2 days - but I got exactly what I wanted and saved anywhere from $1189.99-$2615.27! Worth it? Oh heck YES!!!!
Liked this post? Check out:

You might also be interested in:
 |
| How To Re-Upholster Furniture with Deep, Folded Tufts |
This is an awesome tutorial! I can't wait to try it myself. I've had some fabric I bought years ago, just waiting to go on the couch! Thanks.
ReplyDeleteOh, and your couh looks FABULOUS!
Wow! Your couch looks wonderful! And that is one excellent tutorial. Great job~
ReplyDeleteWhat an amazing tutorial! It's the best one seen. Thanks for taking the time to document the process so well. Pinning so that I can refer to it when I find that "perfect" but old sofa.
ReplyDeleteAmazing job!!!! (love the picture of the 50's dad lounging on the couch!) Your whole living room is just gonna be perfection!
ReplyDeleteGreat job Abby!
ReplyDeleteWe were just looking at the same two sofas, and we were bummed about their prices. My husband wants to know how much you'll charge for another one like that. :)
ReplyDeleteFantastic job, pinning the tutorial for later.
I am completely blown away. So much hard work went into this couch. But it was worth it for the amount of money saved. Such a great tutorial. It looks STUNNING. Absolutely breath-taking
ReplyDeleteYour whole room area is just going to be excellence!
ReplyDeleteMDF Board
Your Couch is stunning and perfect! You did such a difficult project and it looks like it is very simple on your pics... Just wow!!
ReplyDeleteWow unbelievable the way an old sofa can be transformed into something so beautiful! I read through your whole process and almost felt like I helped with the work..lol..thank you for sharing and inspiring!
ReplyDeleteGreat step-by-step tutorial! Thanks so much for sharing this!
ReplyDeleteThe outcome is just awsome, your new sofa is stunning!
ReplyDeleteThis is Just Amazing!
ReplyDeleteFound You On Pinterest BTW
:)
Wow! That was amazing. Your couch looks fabulous! I am saving your post for a chair makeover I want to do.
ReplyDeleteFantastic job on this sofa! I'm so jealous right now, seriously wishing I could do this. Love the choice of fabric as well.
ReplyDeleteExcellent tutorial. So easy to follow and well explained that I have the confidence to try this myself. I think I will try my luck on a chair first. Thanks for the great tutorial!
ReplyDeleteWow, Im inspired! I bought my sofa with the idea of making a slip cover for it. But man! Reupholstering it would be such a better idea! Thanks for this! Reading through every step, I feel like it's possible now!
ReplyDeleteDid you get the upholstery fabric in Lethbridge? I'd love to do this sort of thing but have a hard time finding nice fabric. Any store recommendations?
ReplyDeleteI did get this fabric from Marshal's in Lethbridge. I also use fabric.com a fair amount, but would recommend ordering a swatch before committing to the whole amount.
DeleteThanks Abby! I'm not sure I'll ever be this talented, but I can dream.
DeleteAwesome tutorial! Many thanks!
ReplyDeleteThank you for this tutorial. I think I will try this on an old big chair next year. I never found such a good tutorial. By the way, this is an awesome blog and I love what you did with your projects. I have been renovating my great grandfather's house all on my own, because you can't pay this if you order companies for everything. And I am always happy finding people who do the same and don't think I'm mad. I'm going to read your entire blog, it's such an inspiration! Thanks for sharing all this.
ReplyDeletegorgeous work, what an inspiration! Thanks for sharing all your knowledge. I love your blog.
ReplyDeleteThanks for being so detailed. This is exactly what I want, and you've given me hope that I'll be able to get it done when the stars align and I find both a house and a couch to go in it. :)
ReplyDeletewow - that was great!...what sewing machine do you have? I am trying to revamp my sofa also but looking for a good sewing machine first that works for upholstery...
ReplyDeleteI just have a simple entry-level Janome machine - it's a little on the light side for doing upholstery work - but with a heavy-duty needle it seems to handle it alright! I've had other machines in the past - but I really love my Janome, I would recommend Janome to anyone!
DeleteI'm dying. You are SUCH a rockstar!!! I just got a crazy sofa for free on Craigslist I can't wait to reupholster. This is going to be my Bible. How long do you think this took you? I really have no reference on how long to expect? Thanks!
ReplyDeleteIt depends on the particulars of your sofa - but I would ball-park it in the 18-24 hours range. Taking out all the staples to remove the old covering generally takes the most time - after that putting the new covering on seems to go fairly quickly.
DeleteThank you!
DeleteI have to admit it. This is an amazing tutorial and the finished product is unbelievable. I was looking at another tutorial that I Googled on reupholstering a couch and I would be embarrassed to even show that couch to anyone. It was horrific. This one is absolutely beautiful. You are definitely artistic and very professional at what you lay your hands on. I'm not to sure that my finished product would turn out even close to what yours did, but I'm going to give it a shot. I've never done anything like this before, so who knows what might happen. I might be a natural or it might be a sign that I need to search elsewhere for a different hobby. LOL. Take care and thanks a million for this tutorial.
ReplyDeletewow, what an amazing job you did, thanks for sharing, it's a terrific tutorial too, most appreciated.
ReplyDeleteYour blog have a Stunning makeover..Nice contents with brilliant ideas..!!!online beds company UK
ReplyDeletewow........ very nice sofa fabric.... Leather Sofa Land
ReplyDeleteYour sofa turned out so well! Thank you for this awesome tutorial!
ReplyDeleteSuch a great tutorial! Has the Furniture Foam held up well? Have the edges collapsed at all so that your butt sinks in between the cushions if your sitting on a seam?
ReplyDeleteFoam has held up really well! No butt sinkage at all! ;)
DeleteThis is probably the best tutorial I have seen for reupholstering a couch! And coincidentally after reading this article yesterday I actually not only found the perfect couch but picked it up yesterday as well! All this to say - you have inspired me!
ReplyDeleteQuick question though - how long do you think this project took you overall? (Thanks!)
It depends on the particulars of your sofa - but I would ball-park it in the 18-24 hours range. Taking out all the staples to remove the old covering generally takes the most time - after that putting the new covering on seems to go fairly quickly.
DeleteBrilliant tutorials..!!
ReplyDeleteSuperb.Brown TV Bed
All the above furnishing items are very nice and applicable for office and home both.both. Thnaks for sharing with us.Corner Sofa Mumbai
ReplyDeleteAll the above furnishing items are very nice and applicable for office and home both.both. Thnaks for sharing with us.Corner Sofa Mumbai
ReplyDeleteI would like to know who did your cushions for the sofa. I didn't see the tutorial on how to do them.
ReplyDeleteThe foam for the cushions came from Ducan Industries, and I made the covers for them (see step 16) - Unfortunately I didn't take many pictures of the process - but hopefully the instructions will be enough for you to figure it out. Let me know if you have any questions about it.
DeleteExcellent tutorial! Great pictures, clear instructions, a real keeper. I have a really nice old (read "well made") sofa on which the upholstery has pretty much disintegrated. I have a slip cover on it but hate messing with it all the time only to have it never look quite right. I'm just waiting until the time seems right to finally tackle it myself. I'm glad you've noted in response to others about how much time to expect. Now my question is do you have a good way to figure out how much fabric you'll need? I know if it's a pattern that can really make it tricky, but my plan involves a solid color. Thanks!
ReplyDeleteThis is a really nice tutorial. Almost makes me want to take this on. I found you because I wanted to see if I could change the arms on my sofa. I want something similar to what you have but have the big overstuffed arms. I think I need to start out smaller before I attempt a sofa.
ReplyDeleteThanks for sharing this!
Thank You for sharing nice information about of Re-Upholster a Sofa, when you shared information step by step that very beneficial for us.
ReplyDeleteLeather Sofa Land
This is so awesome. You have totally de-mystified some things for me. I now feel emboldened to tackle my own furniture! I need my husband to be gone for a few days though-- my visions tend to re-assure him too :S
ReplyDeleteWow! What an amazing tutorial and what a great job you did!
ReplyDeleteWell done.
This is AMAZING. Great work!
ReplyDelete-- http://thedysfunctionaldomestic.blogspot.com/
Amazing, simply amazing!!!
ReplyDeleteThis is just what I've been looking for! My 25 year old sofa is solid, and has been reborn twice: once with professional upholstery about 20 years ago, and once with a professionally created slipcover that cost as much as a new sofa. I washed it and it shrank. It's now a few years later, and I'm ready to try the job myself. Thanks for showing me how!
ReplyDeletethis is an inspirating idea for my first time reupholding specially on the sofa arm the are the most difficult I believe but wish me luck..... yours came out fabulous!!! Thanks for the tutorial .. Love it
ReplyDeleteYour tutorial is fabulous! My mom was an upholsterer and she's always telling me I can redo my sofa, but I didn't feel confident in my skills. Thanks to your tutorial, I now think I can tackle it. Great job!
ReplyDeleteThank you, it is well explained!
ReplyDeleteSoooooo wonderful! Thanks for demystifying this process for me. Were you able to do it in a weekend? Longer?
ReplyDeleteThis short article posted only at the web site is truly good. Flannel Duvet Cover Twin
ReplyDeleteThis is so impressively well-documented. Thank you so much for all the hard work and effort you put into sharing this. I can't wait to tackle a similar project on my own, with this as guidance. :)
ReplyDeleteIncredible tutorial! I'm going to put it to the test this weekend with two matching chairs in my living room. your blog provides good tutorial and very much impressed with your content..Thank you so much for sharing..
ReplyDeleteOutdoor Furniture Covers for Settings
Do you know what size sofa you have? (in inches?)
ReplyDeleteMy sofa is 69" long by 34" wide.
ReplyDeleteI really like the pictures and the way this sofa turned out. My grandma has a couch that she gave me, but it needs to be reupholstered. If I could learn how to do it myself that would be really awesome. I'm really excited for the way that it will turn out and I would love to do a fun pattern for my family room. http://barrymorefurniture.com/Home
ReplyDeleteI know this is an old post so maybe I won't get an answer but I'm wondering if you purchased the couch legs shown in the "after" photo or if they came with the sofa. If you bought the legs, how did you install them? I'm worrying I would install them incorrectly and end up with a broken couch/injured person because of my DIY skills. Thank you so much for posting this!!!!
ReplyDeleteHi Julia! I did add the legs (it came with castors originally). I actually purchased the legs at a 2nd hand store for 25 cents a piece, and then I purchased furniture leg plates from Home Depot (you should be able to find them at any hardware store). They are metal plates that you screw onto the frame of the sofa in the corners where you want the legs, then you drill out the middle hole and just screw in your new furniture legs. This is what the plates looks like: http://www.lowes.com/pd_838-1380-2751_0__?productId=3044351, I hope that helps!
DeleteHi to everybody, here everyone is sharing such knowledge, so it’s fastidious to see this site, and I used to visit this blog daily. Flannel Duvet Cover King
ReplyDeleteI really love your write-ups guys continue the good work. Bedroom Sets
ReplyDeleteJust found you via Pinterest!
ReplyDeleteThis is the most detailed and clear tutorial I have read! I just got 2 Bergere chairs from Freecycle and cannot wait to replace their shredding upholstery. Get this: Underneath the shreds, I can see velvet that doesn't look terrible...
Cushions are down, beautiful legs. You've given me incentive! Thanks.
For the best upholstery materials (Αφρολέξ - Foam - Υλικα Ταπετσαρίας - Χαλιά - Carpets)
ReplyDeleteThank you so much....
ReplyDeleteThis is the very best tutorial I have seen in all
of my searches!
This is going to really help me ..
Thank you so much....
I hope mine looks half as good...
You did such a wonderful job with this sofa! I am looking to get a new couch for my home. I think that the right furniture can make a big difference in the look of a home. I want to find the perfect couch for my living room! Thanks for sharing this information! http://www.timesquarefurniture.com/2013/06/01/bright-and-cozy-sectionals-couches-more/
ReplyDeleteI just wanted to take the time to Thank you! for such a great, in-depth, informative tutorial. I am in the process of reupholstering a sofa I own and I truly appreciate the time you put into doing this tutorial so that I may begin the process with the confidence and knowledge I felt I was lacking. Again ....Thank you!!!!!!!! Definitely the best sofa reupholstery tutorial I have viewed, and I have seen many!
ReplyDeleteWe are planning to change our existing furniture this holiday season and wanted to know best sofa sets in the market and how much it will cost? We are looking for recliners too.
ReplyDeleteWow! Very good job!
ReplyDeletehttp://youthfulblog.blogspot.com/
Wow!!! Very creative post and well informative and one of the best news for all. I also love your furniture idea. Furniture is really an important element of a home. I bought my sofa set from Mr. Furniture. There are many Furniture with a discount price.
ReplyDeleteIn my case, I was looking for a fairly simple, stream-lined sofa for my new living room. Square, but not chunky, mostly modern, but with just a ... sofasroom.blogspot.com
ReplyDeletediysofa.com - How to make chesterfield sofa!
ReplyDeleteWonderful blog post!! I found this post while searching something related to my work. I must say that you have done a commendable job with it! Keep it up!!
ReplyDeleteCarpet Cleaning Service | Blinds Cleaning Service
Re-upholstering a sofa yourself has 2 great advantages: first, you ... ebigsofa.blogspot.de
ReplyDeleteThat couch is exactly what I have! Except my couch is 9". My parents bought it new in 1964 with turquoise vinyl. The last button came off in the late 80's. I covered the couch once, but now I need to strip it all the way down to the wood, due to smoke damage. It will need new legs and repairs to a couple of springs. I expect that it's worth it! I think I'm going to go back to turquoise vinyl again.
ReplyDeleteThank you for sharing! This is exactly what I need to get it done right! I need to make my shopping list...
I have done several upholstery projects and this is exactly how you do it!! Great pictures and descriptions!! Where were you when I started and needed this detailed help! Great job!!!
ReplyDeleteI have done several upholstery projects and this is exactly how you do it!! Great pictures and descriptions!! Where were you when I started and needed this detailed help! Great job!!!
ReplyDeleteHello! I have a matching pink chair and couch from the 1950's and I am so excited to get started! Would you ever consider doing a cushion with piping tutorial? What fabric did you choose for your couch? Thank you, I am so grateful for your know how and knowledge.
ReplyDeleteI need this article to complete my assignment in the college, and it has same topic with your article. Thanks, great share.
ReplyDeletewerkblad
Are you looking for cheap corner sofa london. You can get best
ReplyDeletedeal of leather sofa from Leather sofa land.
I like your website very much thanks for your share.all the imformation are useful for me,I will come again .
ReplyDeletehardsten keukenblad
This is exactly what I needed! I bought a (not too) old Crate And Barrel sofa for $125 off Craigslist several years ago. I had no idea it was a $2000 sofa until I read your post and out of curiosity, looked at their website. It has very classic, very clean, straight lines, which I love, but the fabric has seen much better days. My husband's aunt does beautiful art furniture with her own fabrics, and although I absolutely love her stuff, it is soooooo out of my price range. I am going to attempt an old cheap chair before I give a go at my CB sofa, but you make it look so easy, it's nowhere near as scary as I thought! Thank you!
ReplyDeleteRe-upholstering a sofa yourself has 2 great advantages: first, you can ... furniturecouch.blogspot.com
ReplyDeleteI really love your write-ups guys continue the good work thank you for this. quality leather sofas london
ReplyDeleteThank you for posting this.You most absolutely have built this blog website into something special.live chats
ReplyDeleteYour blog has given me that thing which I never expect to get from all over the websites. Nice post guys! Health Insurance Port St. Lucie
ReplyDeleteThanks for sharing such a nice post! It’s very informative and helpful for beginners. It will help them to easily reupholster their Sofa at home.
ReplyDeleteI found another post that is quite helpful. You can also refer to the following link: http://bit.ly/1BijRk4
Nice post.Thanks for sharing..!!!
ReplyDeletehttp://www.americanpridecc.com
This comment has been removed by the author.
ReplyDeleteGood post....thanks for sharing.. very useful for me i will bookmark this for my future needs. Thanks.
ReplyDeleteFabfurnish Coupon
You clearly explained, including pictures and nicly described also about upholster sofa. Thanks for sharing.
ReplyDeleteI have checked this link this is really important for the people to get benefit from.http://mycomputergamingchair.com and
ReplyDeleteThis is quite impulsive post, I liked the way you write and explain all the things clearly. Thankspayday loan
ReplyDeleteGreat post guys, you have done the nice job, and solved my problem I was in trouble. Thanks a lot.
ReplyDeleteterm insurance quotes
Impeccable sofa upholstery and reupholstery services in Canada at affordable rates. Get your sofa the newest look today.
ReplyDeletehttp://www.infinitystudioupholstery.ca/
Sufficient knowledge you have given to us buddies, I am really so happy to see such awesome blog. electrician Columbia
ReplyDeleteAfter all, what an awesome site and enlightening posts, I would surely bookmark this! Urbandale carpet cleaner
ReplyDeleteNice post. Now you can buy best quality fabric sofa online with best price from Housefull. We provides the best quality furniture at affordable rate with best services. Thanks for sharing your post with us. For more details visit our website https://www.housefull.co.in/sofas/living/sofa/fabric-sofa
ReplyDeleteMany thanks for discussing a really great article! It’s really useful in addition to ideal for newcomers. Will help you them to simply reupholster their own Furniture at home. woodworkingbuddy
ReplyDeleteNice Post. Thanks for sharing such a useful information. It is very informative.
ReplyDeleteSuris Furnitech
I had been trying for the good information and having come to your blog I have found everything which I wanted. Auto repair Aurora
ReplyDeleteI’m eager to find the valuable information and for me this is the right place to get the good stuff.nomoreh1b.com - incredible Dream machines discount
ReplyDeleteObviously this is amazing blog! You are too smart person to deal with this kind of issues! carpet cleaning prices Novato CA
ReplyDeleteAMAZING job! I'm bookmarking this for my couch project. thanks for sharing your process!! you have a real talent
ReplyDeleteNice post. I love the design of you furniture.
ReplyDeleteAffordable Furniture
Every week-end I used to pay a fast visit this site, because I’d like enjoyment, because this web site conations certainly fussy material.official site
ReplyDeleteThanks for the great post on your blog, it really gives me an insight on this topic.
ReplyDeletepipe lining supply
This is really awesome to see homemade sofa which is i really like it that we can make sofas easy with your blog post information that i am able to see..thanks for this post really so useful. blinds dubai
ReplyDeleteThis post is so helpful to make sofa at home in good way because as i am able to see the sofas and instruction which is really good nice post keep doing well and know more click here interior design los angeles
ReplyDeleteThank you..
Hello I am from Greece i create sofas for many years and i am glad to see so talented people! I read your tutorial and... Oh my god!you did a great job with that sofa and the tutorial is wonderful with such details!Thank you for sharing it with us.http://sofa.gr
ReplyDeleteThank you so much for taking the time to create such a detailed tutorial. I am going to do it.
ReplyDeleteI am amazed by all the details of the entire project, I loved it. Let me ask you something, would you like to share the source of all your materials and tools? I would like to become one of their clients. Elsa
ReplyDeletehere good to know about this post for home sofa which nice to know about this i have seen all images of your post which i really like it how to make sofa at home...nice post home renovation dubai
ReplyDeleteThanks for this post..
Nice to see the entire process of how to make good sofa for home and your presentation is good to see here really nice, you have great story...interior designers manhattan beach interior design manhattan beach
ReplyDeleteNicely written blog about the sofa which is impressive and knowledgeable. Thanks.
ReplyDeleteleather sofa sale london
bedroom wardrobes london
Thank You for sharing nice information about of furniture. really you did share very useful information with us.
ReplyDeleteTwo seater leather sofa UK
Thank you, this will be greatly helpful.
ReplyDeleteThank you, it is well explained!
Absolutely gorgeous! Thanks for the tutorial. How long did it take you? I'm considering reupholstering a couch, but I'm not sure if i can make the time investment.
ReplyDeleteit's good to see your post for about how to make sofa at home and you have describe well step by step which is nice to see and know...http://mmbo.in/
ReplyDeleteThanks for taking the time to discuss that, I really feel strongly about it and love learning more on that topic. If achievable, as you gain competence, would you mind updating your blog with more information? It is highly helpful for me.
ReplyDeletepriser på gulvafslibning
This is by far the best tutorial I've seen. I now have a guide to follow for my project. Thank you.
ReplyDeleteThis is such an amazing tutorial! It lifted my confidence that I can too do this with my poor couch. Thank you so much for your hard work and for sharing it with us!
ReplyDelete/L
excellent work! congratulations!!
ReplyDeleteThis is a great tutorial. Really helped me understand what I need to do and what steps I would need to take. I found some beautiful velvet fabric from www.topfabric.com and can't wait to get started!
ReplyDeleteThat was an awesome tutorial and a job. I have done a couple of pcs. Did well with them, until the last one. I cut my fabric by the removed sections. Batted the arms and back. Couldn't figure, for the life of me, why my clips were showing. Dang it. I didn't allow for the extra batting. I was sick. Used every fraction of the fabric. It still turned out fantastic, thank goodness that it had a back pillow and a seat cushion. I learned a valuable lesson on that one. Thanks.
ReplyDeleteThis comment has been removed by the author.
ReplyDeleteFantastic Tutorial which gives me courage to upholster my sofa bed!
ReplyDeleteThanks to a brilliant effort in publishing your article. One can be more informative as this. There are many things I can know only after reading your wonderful article. office furniture Miami
ReplyDeleteThank you so much abby. This post is really time worthy.Upholstery fabric really also gives a ethnic look to place. I will be pleased to you on my store at
ReplyDeleteBest sofa fabrics in jaipur
How to make old sofa set in developed New sofa.Online Shopping in Pakistan
ReplyDeleteWe don't deal in bycast but I have a piece of leather here that has a film on top of it which is very similar to a bycast and you can see that is quite loose. Demir Leather
ReplyDeleteFantastic tutorial, thanks for sharing with us.
ReplyDeleteOffice Furniture Stores
This blog inspired me to return to remodeling my home. I appreciate your detailed visuals and steps on how to meticulously reupholster furniture. Flo Furnishings
ReplyDeleteWonderful tutorial, you're very talented! I just got my home improved by the home expert flooring, but I'd love to do something by myself to add a personal touch to the fresh design. Might try this one, cheers!
ReplyDeleteHi Very Nice Blog I Have Read Your Post It Is Very Informative And Useful Thanks For Posting And Sharing With Us And Your Writting Style Is Very Nice
ReplyDeleteSofa Cleaning Montreal
Do as many coats that you need. This is what mine looked like after 6 coats of dye. I let it dry about 1 1/2 hours between coats Demir Leather
ReplyDeleteits been years and there are people like me feeling great with what you have shared, its awesome.. Thanks bunch
ReplyDeleteIts really a great post and good to see the classic collection of fabric.
ReplyDeleteUpholstery Fabric
Hey, I think this is the one stop solution for need of latest designed sofa, thumbs up for the uploaded HD pictures. I have bookmarked your blog for the future references.
ReplyDeleteHiren
Corner Sofa Maker
Fantastic! very nice tutorial about re-upholstery for a sofa.Your points will be very helpful for me.
ReplyDeleteReupholster Sofa Dubai
Great post. Thanks for sharing such an unique article.
ReplyDeleteGreat share indeed, the content seems really interesting.Thanks for sharing the post.
ReplyDeleteThis comment has been removed by the author.
ReplyDeleteBest tutorial I've ever seen on this. Thanks so much!!
ReplyDelete16,000 Woodworking Plans With Step-By-Step Details, Photos, Materials Lists And More!
ReplyDeletehttp://woodworkingplanspro.weebly.com
Hope it will help you next time !
Amazing post! I've progressively turn out to be enthusiast of the post as well as want to recommend placing a few brand new improvements to create this far better.
ReplyDeletefabric sofas
Great article. its very interesting and informative. Thanks for your sharing this unique article. Thank you.
ReplyDeleteLiners in Chennai
Curtains and Roller Blinds in Chennai
I’m really happy to say it was an interesting post to read. I learned new information from your article, you are doing a great job. Keep it up. High Quality Boat Upholstery USA
ReplyDeleteAffordable Boat Upholstery Services in USA
Thank you so much for sharing that amazing post with us. We will stay connected with your blogs for the future posts.
ReplyDeleteModern Sectionals South Florida
thanks for this detailed information.. you put a great effort in this article. love your post
ReplyDeleteRTA Cabinets
Excellent and Ultimate design That every one should give a try...
ReplyDeleteRestaurant Parts
Pretty good post. I just stumbled upon your blog and wanted to say that I have really enjoyed reading your blog posts. Any way I'll be subscribing to your feed and I hope you post again soon. Big thanks for the useful info Slipcovers for curved sectional sofas
ReplyDeleteI believe this is one of the such a lot vital information for me.
ReplyDeleteAnd i’m satisfied reading your article...EAI Solutions
This is really nice to read content of this blog. A is very extensive and vast knowledgeable platform has been given by this blog. I really appreciate this blog to has such kind of educational knowledge.
ReplyDeleteรับกำจัดไรฝุ่น
nice
ReplyDeleteProfessionally written blogs are rare to find, however I appreciate all the points mentioned here. I also want to include some other writing skills which everyone must aware of.
ReplyDeleteทำความสะอาดที่นอน
Sometime few educational blogs become very helpful while getting relevant and new information related to your targeted area. As I found this blog and appreciate the information delivered to my database.
ReplyDeleteวิธีเลิกยาไอซ์
Egyptian cotton is a very nice fabric and it is easy to wash and quick to dry. King size bed sheets are the bed sheets for a huge size bed. King size Egyptian cotton sheets are available at Patari Home. They provide beautiful prints at reasonable prices.
ReplyDeleteThanks for sharing such useful information about designer beds. I think this is really a very nice post. Thanks for the great content!
ReplyDeleteTreasure Box
Very useful information for people, I think this is what everyone needs. Hurry to get expert essay writing help online in the best writing service.
ReplyDeleteVery useful information for people, I think this is what everyone needs. Why pay someone to do my homework?
ReplyDeleteThis comment has been removed by the author.
ReplyDeleteNorton helpline number
ReplyDeleteMcAfee tech support phone number
Malwarebytes support
Hp printer support toll free number
Canon printer support usa
Nice article thanks for sharing. I think you need this -> thesis reflection sample.
ReplyDeleteThis blog is truly useful to convey overhauled instructive undertakings over web which is truly examination. I discovered one fruitful case of this truth through this blog. I will utilize such data now.
ReplyDeleteกำจัดไรฝุ่น
Fourth, make the most of your new furnishings! It tends to be extremely compensating to discover precisely what you're searching for online when you were unfit to discover it locally. This is the reason online retailers exist so they can offer items that their clients need however can't discover anyplace else. On the off chance that you remember these things when requesting your furnishings on the web, you're certain to turn into a prepared web customer.
ReplyDeleteConsignment
I am thankful to this blog for assisting me. I added some specified clues which are really important for me to use them in my writing skill. Really helpful stuff made by this blog.
ReplyDeleteทำความสะอาดโซฟา
I am thankful for this blog to gave me much knowledge regarding my area of work. I also want to make some addition on this platform which must be in knowledge of people who really in need. Thanks.
ReplyDeleteกำจัดไรฝุ่น
Besides, if you have an extra large sofa at your home then you can consider buying the extra large sofa covers. This sofa covers have a good length and breadth which will surely fit your sofa.
ReplyDeleteThis is the nice post.Thanks for sharing thisLow Cost Boat Upholstery Services Florida
ReplyDeleteBoat Upholstery FL
It’s nice to read a wonderful work like this, keep posting!! Everyone will surely appreciate and love all your next works. If you want to know more about reupholstery services Singapore this website is also the best for you. We also offering services in affordable price.
ReplyDeleteThank you , Godbless and more power!!
iphongthuynet
ReplyDeleteiphongthuynet
iphongthuynet
iphongthuynet
iphongthuynet
iphongthuynet
iphongthuynet
iphongthuynet
iphongthuynet
Thank you for making this astounding article, informative and knowledgeable!! We have so much to learn from this. Anyway, If you are interested and looking for
ReplyDeletereupholstery services Singaporeyou may visit our website. You can also check our available services to offer. Thank you and More power!!
The ideal structures best futons are strong from the forearms and thighs and legs on the platform on its. The very best kinds present an added group of legs for additional support in the center of the structure. You will discover futons with or without hands; manufactured from aluminum and wood, or plastic material; and they also appear in a range of elaborate designs
ReplyDeleteTopHomeworkhelper.com have provided the students with instant homework help and assisted them in improving their academic performance everytime is requested.
ReplyDeleteBuy all types of modern and luxury Italian leather chairs Italian leather chairs form lusso sofas. Lusso Sofas is the collection of Italian Leather Furniture and Italian leather couch.
ReplyDeleteGood work, Well detailed and explained by the author. Hoping that it will inspire more readers. Thank you for sharing this author. Randomly, reupholstery services Singapore our company offers service at a very affordable price, feel free to visit our website if you are interested. Thank you and God bless!
ReplyDeleteIf you are looking for HP Printer Support Phone Number 1-855-499-1999. Then this is the best direct number to the HP printer customer services team. We have sourced this number to save your time searching over the internet for the HP Customer Support Phone Number.
ReplyDeleteHP Printer Support Phone Number
Thanks a lot, this is a great article
ReplyDeletePayment Services Provider
Great job for publishing such a beneficial web site. Your web log isn’t only useful but it is additionally really creative too. There tend to be not many people who can certainly write not so simple posts that artistically. Continue the nice writing.
ReplyDeleteFabric sofa
Great article, such a great information for me, i am a professional developer thanks You’re doing a great job Man,Keep it up.
ReplyDeleteFabric sofa
Thank you for some other informative blog.FABRIC SOFAS Where else could I get that type of information written in such an ideal means? I have a mission that I’m just now working on, and I have been at the look out for such information.
ReplyDeleteFabric sofa
if you have kind of Apple macbook doubt or quires about it so just ring the bell on macbook support number:18003823046 it’s toll free and sort out the all queries with our special hired experts technician who have lots of experience about Mackbook technical issues.
ReplyDeleteSometime few educational blogs become very helpful while getting relevant and new information related to your targeted area. As I found this blog and appreciate the information delivered to my database.
ReplyDeleteFabric sofa
Thanks for trying and sharing! I have the exact one and I bought for the same reasons. Now with kids it looks as yours, before cleaning. To resolve the problem I bought sleepcovers, but the material is like a magnet and it looks even worst. I will definitely do this. Thanks!
ReplyDeleteFabric sofa
Talking about reupholstery services Singapore was another thing that I must be knowledgeable enough since I wasn’t really care about it.
ReplyDeleteSuch a great Post!!
ReplyDeleteThanks for Sharing!!Low Cost Boat Upholstery Services in USA
Best Boat Upholstery in USA
HP Printer Technical Support Number is an amazing crew of professionals who are pretty remarkable when it comes to deliver gadget restore associated services. The specialists at this assist team are pretty talented and humble whilst rendering their help.Dial HP Printer Support wide variety to ask for options towards your queries, anytime.
ReplyDeleteOutdoor garden furniture
ReplyDeleteYou can make your outdoor space as comfy and inviting as your indoor space by opting to buy intricate, elegant and stylish outdoor garden furniture from Home Gift Garden.
Our extensive catalogue allows you to choose furniture as per your choice and need without blowing the budget. We strive to serve our customers in the best possible way
so you may contact us anytime if you have any queries. Outdoor furinture for Garden
https://www.homegiftgarden.co.uk/contact-us/
Contact Us: 020 8381 5687 or 07946 584143
HomeGiftGarden.co.uk
ReplyDeleteThis Blog is Best giving the great info and knowledge to us thanks. Looking for any dinner dinning table check out us for bonus tips from me for cleaning the furniture
Treat the wood with a dilute solution of teak cleaner and then of brightener ... Vacuum the whole boat, including the stripped and sanded wood
Wholesale Furniture Shops In Chennai
Home Furniture Chennai
Furniture Shops In Adyar
Best Furniture Shops In Chennai
Furniture showrooms in chennai
Teak Wood Furniture Chennai
Wooden Furniture Chennai
Furniture Shops In Chennai
Furniture Stores In Chennai
Thanks for sharing such useful information . I think this is really a very nice post. Thanks for the great content!
ReplyDeleteFabric sofa in UK
Talking about reupholstery services Singapore was another thing that I must be knowledgeable enough since I wasn’t really care about it.
ReplyDeleteคาสิโนออนไลน์ ได้เงินจริง เว็บพนันออนไลน์ตรงจากทีมงาน GTRBET บนมือถือ สมัครใหม่แจกเงินโบนัสฟรี เครดิตฟรีถอนได้ 1000 ฝาก - ถอน เล่นพนันได้ตลอด 24 ชั่วโมง
ReplyDeleteGTR CASINO
คาสิโนออนไลน์
บาคาร่าออนไลน์
โปรโมชั่น GTRBET
GTRBET
https://www.gtrwin.com/
Sign in to enter office arrangement item key. Expertise to profit, download, introduce, set in development, uninstall and reinstall MS office arrangement and Get Started at this point Office setup.if you have any inquiry identified with officecom then contact us.For your PC extreme assurance, you can utilize the Webroot antivirus preliminary form free from Webroot site www.webroot.com/safe. You can secure your framework against infections, dangers, malware and increasingly online dangers.
ReplyDeletewww.office.com/setup | WWW.WEBROOT.COM/SAFE
Nice article I was really impressed by seeing this blog, it was very interesting and it is very useful for me.Informative blog! it was very useful for me.Thanks for sharing.
ReplyDelete2/3 seater sofa in UK
Thank you so much for this wonderful post,your information is always good!!
ReplyDeleteBoat seat covers Oshawa Ontario
Thank you for sharing useful information amazing wonderful awesome fantastic Your Latestbloggerseotipstraining article impressed me very heartily. Please kepp sharing my linlks.
ReplyDeleteFabric sofa in UK